

Have you ever struggled with organising your kitchen cabinet? Perhaps your kitchen drawers are full of junk, and your cabinets have no organisation? If so, you need to learn how to organise kitchen cabinets.
Organising the storage space in your kitchen is a great time saver. Instead of trying to find things or unloading half your appliances before reaching what you need, you can open the designated cabinet and immediately get the item you want – simple!
If you feel that your kitchen needs a revamp, read on to find the solution!
How to Organise Kitchen Cabinets – A Simple Guide
How to Organize Kitchen Cabinets in a Small Kitchen-
Use every nook
Divide your kitchen cabinet by zones
Give important on removal bins
Add open sleeves
Don’t overcrowd your cabinet
Add build in storage
Make individual drawer
Use clear canister#kitchenhttps://t.co/lyIvQFqrDU— Home E Concept (@Home_E_Concept) October 18, 2021
So, where do you start? After all, a kitchen should have ample space, and you will often have multiple kitchen drawers and storage space. Don’t worry. This process can be made simple by following the seven-step guide detailed below:
Step 1: Pre-planning Is Everything!
Many people jump straight into the process and empty their cupboards immediately. While this can work, we find that pre-planning helps hugely.
If you empty your cabinets and organise them, the process can soon become confusing.
Therefore, we advise creating a plan of action first. This could first include listing all of the items in your kitchen. Please write down the items on paper and segregate them into logical categories. Categories could include cleaning products, baking supplies, and food storage.
Next, look at the cabinet space you have available. You can then formulate a logical plan of what items should be stored. This may seem overkill, but spending 10 minutes planning your kitchen items and storage will save you more time later.
Step 2: Empty Your Cabinets
The next step is the toughest and requires the most effort. It would help if you first empty your cabinets. By emptying your cupboards, you can start from scratch. This also makes it easier to see what items you have and if something needs to be thrown away. Removing everything from storage also helps the cleaning process.
Before emptying out everything, make sure you have plenty of space in your kitchen. Clear your dining table or kitchen island to organise the items easily, so you don’t have to bend too much to place them down or pick them back up.
Take great care when removing items, particularly from your upper cabinets. Don’t overstretch, and only lift items you can comfortably handle. If any appliances are too heavy – don’t risk them. Instead, ask someone to help.
It will be easier to organise all your items into groups, as detailed below, once you have emptied your cupboards.
Step 3: Organise Your Items Into Logical Groups
Now that everything is out of your cabinets, it is crucial to organise it appropriately. Keeping common groups of items together makes them easier to find. Plus, you can easily track whenever you need to purchase new supplies.
Examples of common organisation groups could include:
- Cleaning supplies
- Pots and pans
- Canned goods/non-perishable food
- Cutlery & crockery
- Appliances
- Pet supplies and food
Looking at the items spread out on your work surface or dining table, you should easily create logical groups. Once you have done this, you can then look to designate cupboards specifically for these items.
Step 4: Declutter and Throw Away Any Non-essential Items
Now is the perfect time to throw away useless items. It would help if all your utensils and appliances were organised logically on your table or work surface. Look at each item and ask yourself:
- Will I ever use this item?
- Is it still usable and within its use-by date?
Frequently we simply horde items in our kitchen: these could be things like gimmicky gadgets or appliances for particular foods that we never ended up making. These only add clutter to your kitchen; you could use that space for something useful instead if you throw them away.
When throwing items away, try and do so in an environmentally friendly way. Alternatively, if you have appliances, consider taking them to a charity shop or asking friends and family if anyone wants them first!
Step 5: Clean Your Cabinets
With your cupboards empty, now is the perfect time to clean them. Providing you are careful and handle items properly, your kitchen cupboards should not get too dirty. However, over time, grime, grease, and dust can accumulate.
The cleaning process is quite simple. Use a wet cloth with some kitchen spray. Thoroughly wipe each cupboard, worksurface, and things like shelf risers. Finally, wipe the shelf bottom, the sides and back, and the cabinet doors.
Also, wipe the outside of each cabinet door and the handle. It is not surprising that handles can often accumulate food, dirt and grime from constant opening and closing.
Once you have given each unit a thorough clean, leave them dry or use kitchen towels to dry them manually. Remember that cabinets must be completely dry before replacing any items inside them. You can leave the doors open to let fresh air flow into them since this will also help the drying process.
Step 6: Place Shelf Inserts on Each Surface
Shelf inserts or shelf liners are simple but effective items. These simple kitchen cabinet organisation ideas will help protect your cabinet interiors from damage.
Also, if you do have any spillages, the shelf liners will soak up the spilt items and prevent any from staining your cupboards.
Place a shelf liner on the base of each cabinet and every shelf. Keep in mind that the liners must fit flush to the bottom of the cabinet or on each shelf. As mentioned before, make sure that the cabinets are completely dry before inserting shelf liners.
Step 7: Organise Your Kitchen Cabinets and Load Everything Back In
Your cupboards and shelves are now ready for filling! Hopefully, you should have organised your items into logical groups and know where to put things in kitchen cabinets. If so, you can place the items into their relevant storage unit.
Ensure that you place more frequently used items at the front for easy access. Also, consider keeping heavier things like mixing bowls, cutting boards, or other bulky cookware items in the bottom cabinets, so you don’t have to lift them above your head.
Metal or cast iron pots and pans should also be kept relatively low so that you can access them quickly and don’t cause any injury lifting them.
Organising Kitchen Cabinets – Tips and Tricks
As you can see, that simple seven-step guide is easy to follow. Yes, we admit that this process initially takes time and effort. However, the struggle to put things in kitchen cabinets is always the toughest.
We believe that you can easily maintain an organised kitchen by keeping on top of the process and continuing to place items back in their correct place. To help further, we have provided some simple tips for cabinet organisation below:
1. Accessibility Is Key
When filling your kitchen cupboards and shelves, you must think about accessibility. By accessibility, we mean how easy the items are to reach, lift, and remove.
Firstly, you must consider the spacing of the items. Is there sufficient space between each item so you can firmly hold it? Secondly, you must think about accessibility for the items at the backs of shelves and cupboards. Can you still reach those at the back, even if there is something in front?
To help sort this potential issue, you could consider placing taller items at the back so you can easily reach over the smaller ones and get them still.
Next, think about the weight of the items. As stated before, you should keep heavy appliances at a middle height. For example, around waist height if possible. This is the ideal height for lifting heavier items and will put less strain on your back.
If you place heavy items too low, you have to bend further to pick them up. This can be highly dangerous and can cause back injuries. Alternatively, if you place them too high, you risk dropping the items on your feet, harming yourself.
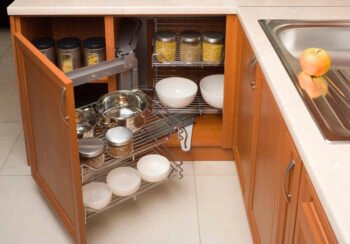
2. Utilize Awkward Spaces
Often in kitchens, we have strange spaces that go unutilised. For example, these can be awkward spaces in cupboards like corners or diagonal angles. Don’t simply ignore these spaces! You can use any available vertical space in your kitchen – you have to be creative and do a little imaginative storing of your items!
3. Minimize Counter Clutter
Another simple thing you can do to organise your food prep area is to minimise clutter. We often have a habit of simply keeping items on our kitchen counters. Common examples include appliances, mugs, the kettle, and chopping boards.
Does every item currently on your kitchen top need to be on it? If not, store it in your cupboards or shelves! The fewer items you can keep on your kitchen top, the more space you have for food preparation, cooking, and baking.
4. Think About What Items You Use Frequently
During the planning stage, or when you have emptied your cupboards, it is a great idea to look at your items and decide what you use the most.
The idea here is to place frequently used items at the front of your cupboards or shelves to reach them easily: this will help save time and effort. Instead of moving appliances that you never use out of the way, you can access the important items immediately.
For example, there could be that special set of plates and crockery that you only use at Christmas! Or perhaps you have a coffee machine that you only use when inviting guests to your house. Look at each item, and honestly think about how often you use them. You can then store them appropriately to make your life easier.
5. Use Labels if Necessary
Labelling is a great way to help the organisation in your kitchen. For example, you may have decided to remove some items or food from their packaging and place them in special storage containers. If so, it can be somewhat confusing trying to remember what is in these containers! In these instances, labels come in handy.
You could create homemade labels using paper or sticky labels. Also, if you regularly label items, you could buy an electronic label printer. These are simple handheld devices with a reel of sticky paper. You can type in the label on an LCD screen using the keypad and then print it off!
Labelling is incredibly useful for things like spices, herbs, cereals, and other food that is not always easy to identify. You could also use it to label things like baking trays and specify their measurements.
6. The Junk Drawer
Most people have a designated junk drawer in their kitchen which can be highly useful, but it can also have drawbacks.
On the positive side, a drawer full of random items often comes in handy. You can guarantee that eventually, you will need one of the items in the drawer: an Allen key, perhaps, or a set of AA batteries. This type of drawer is a brilliant idea and can help have a joint place where all the random things that don’t belong can be stored.
On the negative side, a drawer filled with junk doesn’t help your organisation’s mantra. This type of drawer can promote laziness. Instead of finding a proper place for something, or throwing it away, throw it in the junk drawer! This can be counterproductive. While the rest of your kitchen may be tidy and organised, you still have that one drawer bursting at the seams.
You must decide if you want a drawer like this or not. If you do have one, we recommend clearing it out regularly and trying to give it some organisation. For example, you could place your assortment of batteries in a separate container inside the drawer.
Although this drawer is full of random items, it can still be organised!
Kitchen Cabinet Organisation Ideas FAQs
Where Should Everything Go In My Kitchen?
There is no straight answer for this. Where items go is entirely up to you. Try to think logically, group similar items together, and do what makes sense for you. What works for someone else may not necessarily work for you.
How Often Should You Wipe Your Kitchen Storage Units?
Firstly, judge this by checking each kitchen cabinet. If it’s dirty – wipe it. If everything is clean, there is no need to wipe your cabinets regularly.
How Do You Keep Your Cabinets Fresh?
Use shelf liners to protect the shelves. Keep cupboard doors closed so moisture and excess air cannot get in. Make sure foods are stored properly in airtight containers. Avoid exposure to water. These are all simple methods to help keep your cabinets fresh.
Make Your Kitchen a Haven of Organisation Today!
We hope you have found this guide on how to organise kitchen cabinets for kitchen cupboards very helpful. Indeed, it is essential to keep your kitchen cabinet space tidy, so make sure to keep up with this practice, for it is beneficial in so many ways.
Firstly, these storage solutions for kitchen cupboards will help keep at bay mould and dirt. Secondly, they will make your life much easier! Then, since you have better use of vertical space, you can use the entire kitchen cabinet to its full potential. More than that, you have a sense of control because you can avoid buying double items. Last but not least, moving forward, you’ll have higher motivation always to declutter and upkeep your kitchen cupboard organised.
Who wouldn’t want clean cabinets and food storage containers? Who wouldn’t want to be able to use their kitchen items, cleaning supplies, and kitchen essentials without rummaging through cupboards and creating a mess? Why not use these kitchen cabinet organisation ideas and make your kitchen a haven today?
Additional Resources
- How to Make Breadcrumbs Without a Food Processor
- When to Rack Wine
- How to Use a Pressure Cooker
- How to Use a Coffee Grinder
- How Does a Milk Frother Work
Paul is the type of person who never met a problem he couldn’t fix. He can always be found tinkering with something in his house, even if it isn’t broken! His tips and tricks are often shared on our site. He’s the one you call when something breaks because he has been known to improvise fixes for everything from leaky faucets to malfunctioning dryers.