
A table saw is a brilliant tool for cutting wood and other sheet materials. These tools are invaluable for woodworkers and also great for home DIY usage. This type of saw is also one of the easiest to use. However, they still require care and a considered approach to make effective cuts. Therefore, if you have such a tool, we have created a simple guide on how to use a table saw for your benefit – enjoy!
Step by Step Guide to Using a Table Saw
Step 1: Safety Warnings!
When using any power tool, safety is paramount. Even if you are an experienced carpenter or construction worker, you cannot underestimate the importance of safety.
A cabinet saw is a potentially dangerous piece of equipment. The exposed saw protruding from the table spins incredibly fast and is sharp. As a result, you could slip and cause serious injury. It is, therefore, necessary to concentrate, remain focused, and gear up!
Yes, safety equipment should always be worn when operating a table saw! We know that many people are reluctant to wear PPE. However, to us, it’s a simple choice. Wearing safety equipment should be considered for woodworking projects, or potentially lose a limb!
Safety Gear When Using a Table Saw:
- Safety glasses
- Ear protection
- Safety gloves
Glasses will protect you from any shards of wood that could fly up into your face. Alternatively, ear protection can prevent damage to your hearing from the operation noise. Finally, safety gloves can protect your hands from splinters and cuts when handling the wood.
Step 2: Know Your Table Saw
As with any tool, you must understand fully how a table saw works. To use a table saw, first read the instruction manual thoroughly. The instruction manual will describe the different parts of a table saw. Also, it should demonstrate how to adjust the blade height. Ideally, it will also show how to change the table saw blade.
If you don’t have a clear understanding of these things, you will not be able to use a table saw effectively. Therefore, before you even get your wood ready, study the table saw and instruction manual! Also, it is advisable to have a decent understanding of the common parts of a table saw.
Oof. My table saw motor fan recently did this. I just found the last blade the other day. The fan cover fits better now.
— Dinger (@GDingr) April 26, 2021
Parts of a Table Saw:
- Table
- Fence
- Blade
- Blade insert
The table is the main part of the table saw. It is what you will place your wood on to push it onto the saw blade tooth. Some tables may have markings on to help when making different cuts like dado cuts.
Many table saws also have a fence. The fence is usually a piece of material that runs parallel with the blade. Often, the fence can be adjusted using a locking mechanism. For example, you may be able to move it closer or further away from the blade for different cuts.
For cutting tasks, the blade and blade insert are the most important parts. Table saw blades are quite large, and part of the blade protrudes from the blade insert. The blade insert is essentially a slot cut into the table. There may also be a small blade guard for added protection. It is also essential to understand the safety devices and any emergency stop buttons, for example.
Step 3: Setting the Blade
Once you have your safety gear ready, you need to adjust the blade height and set the table saw. The common practice is to set the blade height a little higher than the material that you want to cut.
There is no set rule, but a rough guide would be approximately 1/8-inch higher than the material. Setting the blade height slightly above your material reduces the risk of injury. If you do slip, you should only receive a minor cut.
This is the project I’m working on now, a sawbench & a bent. I cheated a little using the table saw to cut the pieces to width. I’m off to my dovetail class tomorrow but I’ll resume work on this Monday. pic.twitter.com/DdgyEXOXI9
— Karen Lebens (@farwest8) May 1, 2021
Therefore, first, either measure the material to be cut or place it flat on the table next to the saw blade and table insert. You can then see how high you need to adjust the blade. Usually, there is a height adjustment wheel to adjusting the height that allows you to alter the height incrementally. If you did step 2 properly, you should have a clear understanding of how to do this.
Step 4: Preparing the Wood
With the blade height set, you need to mark your wood and prepare it to be cut. Any woodworker understands the importance of marking techniques to get quality cuts. To mark the wood, you will need a pencil, tape measure, and potentially a ruler or straight piece of material to draw the cut line.
Measure the distance you wish to cut and make pencil marks along the length of the material periodically. You can then use your tape measure or straight piece of material to draw a pencil line across the marks. It clearly indicates the cutting line.
Also, we advise marking the offcut piece (if there is one) with a pencil X. By doing so; there is no confusion in which part of the material you need to take care of and keep.
Lihat postingan ini di Instagram
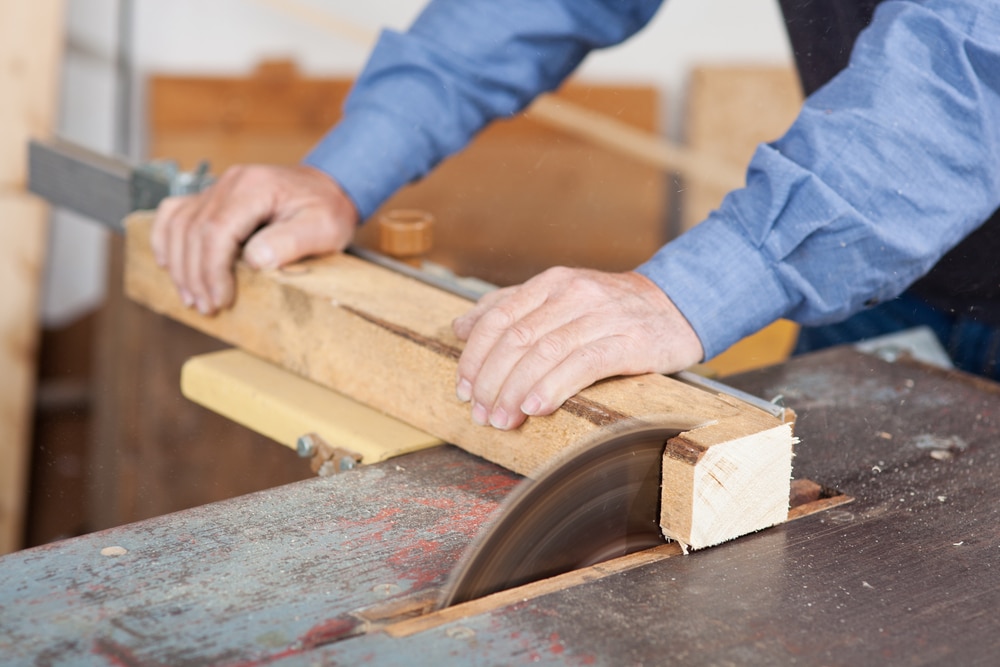
Step 5: Making the Cut
The cutting process is relatively simple. The basic process is – place the wood flat on the table, line up the cutting line with the blade, turn the power on, and push the wood through the blade across the cutting line.
It is where the fence helps. An experienced woodworker may be able to guide wood through a saw blade without a guide. However, for beginners, the fence guide will ensure you get a straight cut. If you use the fence, adjust it whilst the wood is placed flat on the table and butted up against it. The fence should be moved back so that the wood fits snugly against it and so the cutting line is aligned with the blade.
When you have the wood and fence in position, tighten the locking mechanism of the fence. Ensure that you tighten it completely; otherwise, the fence could move and cause your cuts to be unaligned.
With the fence set, you can reposition the wood. When the wood is in position, press the power button to start the spinning blade. Hold the board firmly. Slowly but firmly push the board against the blade along the cutting line. It is essential that you are firm but do not apply excessive pressure. If you are too hard with your techniques, you could cause the blade to kick back and potentially fly out and hit you!
Some people opt to use push sticks to guide the wood across the blade. A push stick is essentially a piece of material that can securely push the wood along the length of the blade. By using a push stick, you are not placing your hands near the blade, which makes it safer to use. However, a push stick reduces the amount of control you have over the cut.
Different Types of Cut
When looking at how to use a table saw, it is important to look at the different woodworking cuts. The following are common woodworking cuts for a table saw:
- Rip cut
- Bevel cut
- Dado/groove cut
Rip Cuts
Rip cuts are the most common type and a table saw performs well for this technique. Rip cuts are where you are cutting a larger piece of material into smaller sections lengthwise. Due to the size of a table saw and the way it is configured, a rip blade cut is easy to do. Aside from a circular saw, a table saw is the only cutting device that can make effective rip blade cuts.
Bevel Cuts
Next, we have the bevel cut. A bevel cut is an angled cut along the length of the wood. Bevel cuts are beneficial for making strong wood joints. Most table saws can angle the blades up to 45-degrees. It can allow you to make a simple bevel cut, even along long lengths of board.
Dado Cuts / Groove Cuts
A dado cut or a groove cut is also a speciality of this type of saw. This type of cut creates a groove in the wood that can form strong joints. To create this type of cut, you need a specialist blade – dado blades or a wobble blade. Dado blades can effectively cut this type of groove and make easy work of this technique.
Aside from these popular cuts, you can also tackle some other specialist cuts when using a table saw. Examples include mitre cuts and rabbet cuts. As you learn how to use a table saw, you can try a new technique as your confidence grows. In time, you will be able to experiment with different joints.
Step 6: Clean Up
Your woodworking project should now be well on its way! You should also have some clean cuts to work with. Depending on what you are using the wood for, you may want to sand the cut edges to remove any excess chipping or wood shards.
Also, it is a good habit to clean up properly after each session. We know this is a tedious task, but it will make your job that much easier and make sure you can find your tools and use the table saw easier next time.
This me and my pops lmao. Last year was the first year he ever asked for something so we got him a table saw ???? if I’m paying, you better use it https://t.co/GfIVaz7GQF pic.twitter.com/a8UrT7IF44
— Alvin Moderna aka A.M. (@MindofCAP) April 30, 2021
How to Clean Up
- Sweeping the floor around the table saw to remove any sawdust.
- Dust or sweep the table saw top and around the saw blade.
- Perform maintenance checks as listed below in step 7.
- Place any tools in their storage boxes/units/shelves.
- Consider saving scrap pieces of wood for test pieces.
- Place the finished workpiece somewhere safe where it can’t get damaged.
The cleanup shouldn’t take long at all! Also, once you get into the habit of doing it, it will become second nature. Saving scrap pieces of offcut is also a great idea. You could keep a box of offcut to use as test pieces. It is invaluable when testing new saw blades, or testing your cutting depth, etc.
Step 7: Maintenance
One of the great things about a table saw is that it doesn’t require a great deal of maintenance. The initial delivery and installation are usually the most difficult tasks. However, it is still essential to check your table saw on a regular basis before and after your DIY projects.
Common Maintenance Tasks for a Table Saw
- Check the drive belt for wear and tear.
- Check the saw blade teeth for damage.
- Check the cleanliness of the blade and tabletop.
As you can see, it’s not a large list at all! Table saw maintenance should take 5-10 minutes, but it’s still prudent to always make these checks. A worn drive belt could eventually break and cause internal damage to the tool. Alternatively, a dull or chipped blade will reduce the quality of your material cutting and could affect your woodworking capabilities.
As with any power tools, it is also essential to clean the table saw. You will find that dust and saw chippings naturally accumulate on the table – specifically around the protruding cutting blade. Ensure to sweep or vacuum near the blade and the entire top of the table surface after each usage. Also, make sure that any debris is removed from the blade teeth, so they don’t become clogged.
I just wanted to share something I was working on yesterday. Far from finished, but I have a table saw sled for picture frames now; this is pre-glue up, splines, and finish, but I'm pretty happy with how the pieces turned out. pic.twitter.com/u7zUzUAelh
— Scott Krebs (@Krelos515) April 25, 2021
Table Saw FAQs
What Type of Cuts Can You Make With a Table Saw?
A table saw is a versatile tool that is commonly used to make three main cuts: a dado cut, a rip fence cut, and a cross-cut. Which cut you will use depends on the direction of the cut against the wood and the finish you wish to achieve.
How Deep Can a Table Saw Cut?
It depends on the model and flexibility of the blade height adjustment wheel. A table saw can cut shallow depths of a fraction of an inch in terms of minimum depth. For maximum depth, you can find table saws that cut up to 12-inches.
What Materials Can You Cut With a Table Saw?
Most commonly, you use a table saw to cut wood. However, depending on the tool, you can also use a table saw to cut sheet plastic, sheet brass, and sheet aluminium. It is also possible to get speciality blades for table saws that will tackle different materials more effectively.
Can You Get a Table Saw That Is Suitable For Home Usage?
Yes! There are smaller models of table saw available. Which you buy depends on how much space you have in your DIY workspace. Some smaller table saws measure as little as 25×25-inches and could comfortably fit on a work table.
Lihat postingan ini di Instagram
Working With a Table Saw
Many types of saws are available, but the table saw is one of the most convenient to use in any cutting project. The first thing in using any power tool is exercising safety. You should also be familiar with the different parts of your tool as well as its uses. Lastly, remember to clean up properly and maintain your tool after use, so it lasts longer.
Have you done any projects with a table saw? Do you have any additional tips for using this tool? Let us know below.
Additional Resources
- How to Change a Circular Saw Blade
- What Is a Circular Saw
- When Was the Circular Saw Invented
- How to Use a Mitre Saw
- What Is a Mitre Saw Used For
Paul is the type of person who never met a problem he couldn’t fix. He can always be found tinkering with something in his house, even if it isn’t broken! His tips and tricks are often shared on our site. He’s the one you call when something breaks because he has been known to improvise fixes for everything from leaky faucets to malfunctioning dryers.